3 Dec 2012

Flying Pig 40m 5W transceiver

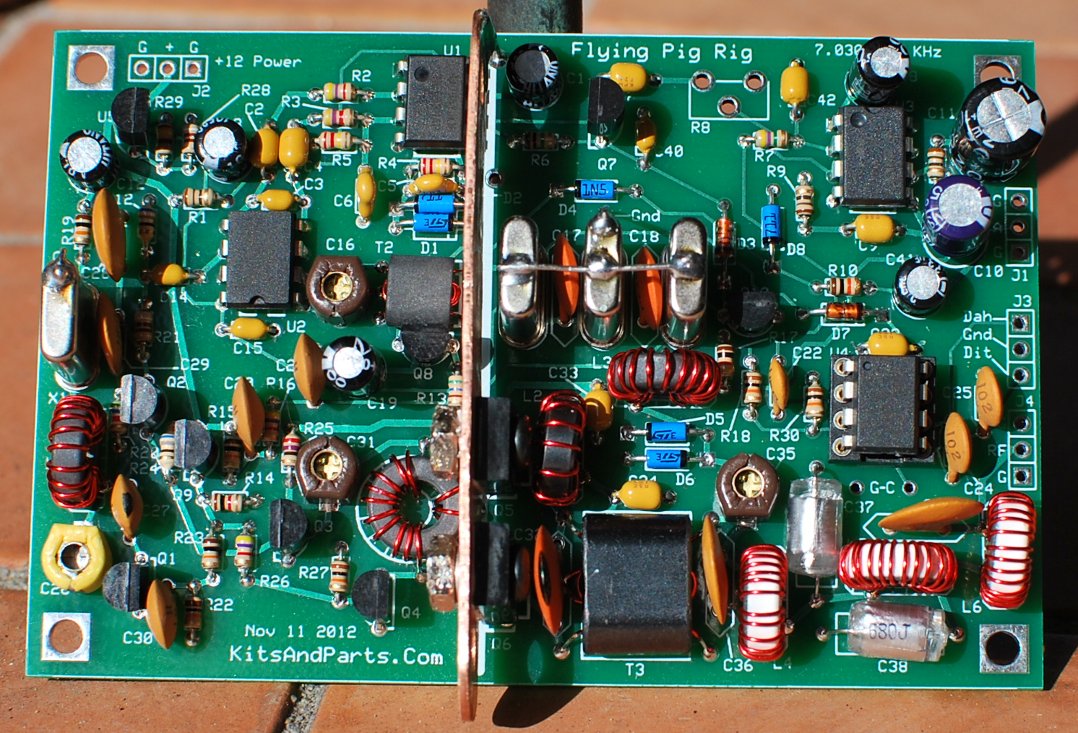
Thanks to Dave in Jakarta (don't know your call Dave) I've been pointed towards the Flying Pig 5W CW transceiver for 40m from Kits and Parts.

The receiver uses a clever direct conversion design using an NE602 with some AGC applied to it. Like the RockMite, it uses some front end crystal filtering to help overcome dynamic range/overload  issues, but with the limitation this is a single frequency radio, for example parked on 7.030MHz, the QRP frequency. Still, a full 5W on the QRP frequency will permit plenty of QSOs.
This is the photo on the http://www.kitsandparts.com/ website
The best news is the price - $40 only, which is good value for a kit. Available from Dec 10th 2012 according to the website.

2 Dec 2012

Drawing schematic diagrams

Several people have asked me what I use to produce schematic diagrams for circuits I put on my website and here on the blog. Well I use a package called sPlan which is available from http://www.abacom-online.de/uk/html/splan.html.  This is the package that many SPRAT authors use. Mine is an early version but the latest version is available for 39.9 euros.
Abacom has a range of useful resources such as front panel labeling software and some very simple PCB layout software.  sPlan is remarkably easy to use and a circuit like the Tenbox can be drawn up in about an hour, simpler circuits even less time.

The Abacom website gives details of distributors in many countries.

Wikipedia

en.wikipedia.org/
Don't know about you, but I refer to Wikipedia just about every single day. It isn't perfect, but it certainly is one of the most useful free resources on the Internet. The quality and quantity of data available there is nothing short of remarkable. I've added a few entries myself over the years too. As a thank you I made a small donation via Paypal and encourage you to do the same if you can spare a little.

As they say in their thank you email, the resource is used by people from all over the world including in schools in developing countries. By ensuring Wikipedia remains free and neutral we are helping to keep the Internet free for future generations.

Magnetic loop HF TX antennas

Although I have successfully used a large 80m sq vertical wire loop (made with 32 x 0.2mm PVC covered wire) on both 137 and 500kHz, I have never tried a hi-Q small loop on HF transmit. There is a very useful calculator available at http://www.66pacific.com/calculators/small_tx_loop_calc.aspx which suggests a 3m circumference loop using a 5mm diameter conductor - for example small bore copper pipe or a thick coax cable - would have a loss of only 0.9dBd and a bandwidth of 352kHz at 28MHz.  This would comfortably cover both 28MHz CW, data, WSPR and beacons without retuning.

An advantage of magnetic loop antennas is reduced detuning from nearby objects so this antenna, if mounted in the loft space, might make a neat and efficient stealth antenna for 10m. I guess one could even arrange to switch the tuning capacitor remotely so that several sub-bands could be covered. When using QRP power levels, as I do, the high voltages and currents that are encountered in small loops are less problematic. For example, choice of variable or fixed tuning capacitors is less onerous than if using 100W.

http://www.kr1st.com/magloop.htm
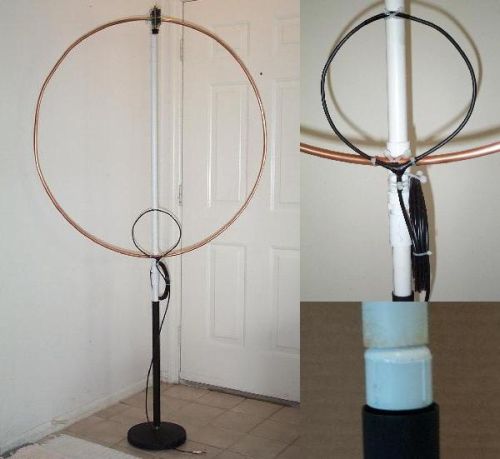
KR1ST has some nice information on magnetic loop antennas on his website.  I hope he doesn't mind me linking to the image of his magnetic loop on his site. There is also some useful loop information on the Wikipedia site.

In all, I think I'm missing out (so far) on a whole range of antenna experiments!

1 Dec 2012

SAQ (17.2kHz) transmission Dec 24th

The following is from the SAQ (Sweden) website:
We plan for a traditional transmission on Christmas Eve Monday 24 December. We plan to start the transmitter at 07:30 UTC and will be on air a few minutes later. A message will be sent at 08:00 UTC. The frequency is 17.2 kHz CW.

 QSL-reports are kindly received:

 QSL reports can be given via:

- E-mail to: info@alexander.n.se
- or fax to: +46-340-674195
- or via SM bureau
- or direct by mail to: Alexander - Grimeton Veteranradios Vaenner, Radiostationen, Grimeton 72, S-432 98 Grimeton, SWEDEN

Note: SAQ is a member of the Swedish Amateur Association (SSA) and "QSL via bureau" is OK.

First on-air testing of the Tenbox TX

This evening, with little sign of F2 propagation, I ventured out to test the range of the 10m Tenbox TX as it is currently. For the TX antenna I used the coax up to my 10m halo as a vertical tuned with the Elecraft T1 ATU. At the RX end, in the car, I used the FT817 with a small base loaded mag-mount.
Tenbox AM TXing with MP3 callsign message on the PC
What I should have thought about was the noise on AM from street lights! When the signal is strong in the village this is no issue at all, but traveling to the next village 3km away there were several spots where the buzz from sodium street lights just killed the little signal. Both antennas are compromised, so another 3-6dB of signal level should be possible with a proper 1/2 wave antenna at each end or with a better car antenna.

Maybe this project, although great simple fun, isn't going to quite meet my needs, whereas a DSB transceiver would?  Receiving the DSB signal as SSB and the improvement over AM will be around 9dB with better noise immunity. However a simple direct conversion RX would not be suitable to use (easily) with a DSB TX, whereas the AM Tenbox would be fully 2-way compatible with another identical AM unit.

Conclusions so far
(a) 6-10dB more may be needed to meet the design objectives with AM.
(b) It is worth repeating the very same test now using a DSB TX with the same power to compare.

The first Tenbox Schematic

The breadboarding of the Tenbox 10m AM transceiver for local cross-town night-time nattering is almost complete now, with just a receiver audio amplifier to drive a loudspeaker to be added. Power output is a conservative 250mW AM carrier (peak power around 1W).  The first schematic draft is shown here, but as always I warn that I may have forgotten to correctly label some parts and the values may change as the circuit is further developed. I hope to road test this over the weekend going out in the car with a mag-mount antenna whilst AM beaconing with the rig from home. As with WISPY, I have paralleled up 4 2N3904 transistors for the PA. This is a very inexpensive way of making a 10m PA stage! The alternative, such as a 2N3866 would be about 5-10 times more expensive.

29 Nov 2012

Small Wonder Lab Kits

Dave Benson K1SWL has produced some wonderful Small Wonder Lab kits over the years including the famous RockMite transceivers, but he has decided to slow down a bit and get back to enjoying the hobby as a hobby. I think we don't realise just how much work is involved in a small ham radio company producing and supporting a range of kits. Dave's point about technical support and repairs rings bells with me: I get around 5-10 questions a week from people interested in my website projects and I am not even selling kits!

This was the notice on his website last week:

"Folks-

I took a ‘leap of faith’ in 1996, leaving the corporate world to undertake ‘Small Wonder Labs’ as a full-time venture.  Since then, it’s been a great experience.  I have to face facts, though: I’m getting older. The shortcomings in vision can be overcome with close-up glasses. More troublesome, though, are the muscular issues from spending hours a day at the computer, or with my head down, sorting parts into bowls.

Over the years, I’ve assisted countless customers with no-questions-asked replacement parts and troubleshooting advice. The issue of repairs has been problematic, though.  While no one really objects to paying $50/hour to have a $1000 rig repaired, that’s not true of a $50-100 kit. I’ve had some good people doing repair work for me, but it’s just not economically viable. Neither can I do the work in a timely manner. Therefore, and effectively immediately, I will not be accepting returns for troubleshooting/repair.

It’s not clear to me at this point if I’ll release any additional product offerings. Although I love the creative process involved in a new design, everything that follows is now just ‘work’.   Along the way, I lost the ‘hobby’ aspect of ham radio. I have not been on the air in almost 5 years. I want my hobby back!

I’ve finished our home here in the woods of New Hampshire, and it’s time for me to move on to other interests.  I’ve still got a garage/barn to build, a garden that grows larger each year, and a wealth of outdoor activities I can’t seem to find the time for. Retirement is clearly not for the faint-of-heart!

I’ll continue to sell RockMites forever, apparently.  Demand is still brisk, with more than 8000 of them out there so far. Ongoing activity for the RockMite as well as support for ‘legacy’ kits occupies me for 2-3 hours each day.  At this stage of my life, that’s ‘enough’.

73- Dave Benson, K1SWL
19 November 2012"
ARRL 10m contest (48hrs Dec 8-9th)

A reminder that the ARRL 10m contest is on next weekend (not this) over the full 48 hours Dec 8th and 9th. As conditions on 10m are pretty good right now this will be a good chance to work a fair number of US, Canadian and Mexican states and provinces, even with QRP levels in CW or SSB. I'm away on the Saturday but hope to be on for the Sunday.

26 Nov 2012

Cutting big pieces of copper laminate

When I was working I had access to a guillotine to snap out large pieces of copper laminate to convenient sizes for project breadboards. Being retired I no longer have this method to hand. SO, I asked a question on the GQRP Yahoo group this evening to find out what other people did. Several suggestions but the favourite is "scoring and snapping", summarised by the post from Duncan G4DFV which I have reproduced below.
"My method of cutting large pieces of copper laminate:-
  • Place a steel rule along a previously drawn line on the board where you require to cut.
  • Pressing down firmly on the rule, using a stanley or other utility knife, score along the line.
  • Repeat the scoring in the same cut for perhaps 10 times, then
  • looking at the edges of the board, you will see each point where the
  • scoring starts and finishes. 
  • Carefully mark these points over on to the other side of the board and  
  • place the rule exactly along a line between these points and score as before.
  • After about 10 scorings, place the board on a flat surface such that the
  • scored line is on a straight edge.
  • Holding the board down with one hand, press down over the straight edge with the other.
  • The board should break cleanly along the scored line.
  • Any uneven/rough edge can be smoothed with sandpaper.
Duncan G4DFV"